


->Mijn blog verhuist; de nieuwe locatie van deze post is Studio Paars - DIY: maak een oorbellenrekje van een fotolijst
+=+=+=+=+=+=+=+=+=+=+=+=+=+
06 earring frame tutorial, a photo by het groene kamertje on Flickr.
I have been thinking for a while about a way to organise my earrings; I have a ton of these tiny studs that I wear a lot and they look something like this: 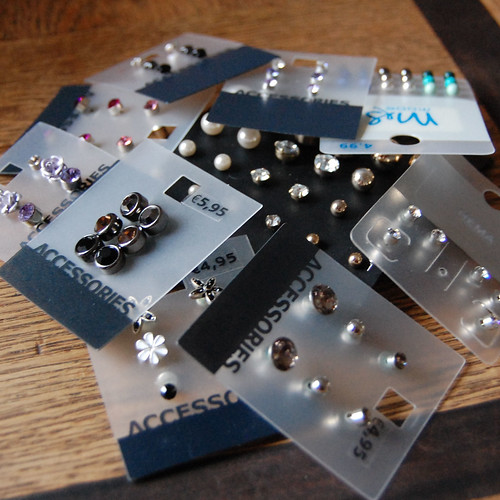
01 earring frame tutorial, a photo by het groene kamertje on Flickr.
And today the solution just hit me! (While sorting out the mess that keeps accumulating in our bedroom, of all things.) Ofcourse I had to go and make it straight away :) So here is what you will need:
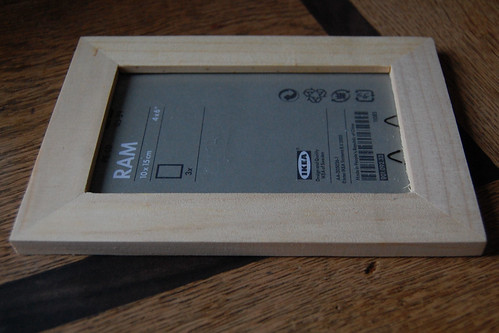
- a small picture frame
- a piece of felt
- some glue
- optional: some embellishments like paint, glue, paper, fabric, ribbon, beads, buttons, anything really!
I used this el cheapo frame from Ikea. First take it apart to check if the glass isn't attached to the frame. This one only had a loose bit of clear plastic. Take everything out, leaving only the bare frame. Now embellish! Let your imagination go wild, or leave it blank, whatever you like. I used some
02 earring frame tutorial, a photo by het groene kamertje on Flickr.
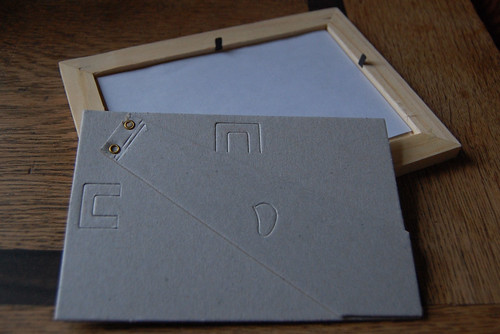
Now cut out a piece of felt to fit in the frame. Use the cardboard backing as a template.
03 earring frame tutorial, a photo by het groene kamertje on Flickr.
Now carefully glue the felt in the frame. I applied the glue sparingly to the inside of the frame, placed the felt on top of the glue, and then I placed the cardboard backing back into the frame to give it some stability while it dried. After a few hours I carefully removed the backing
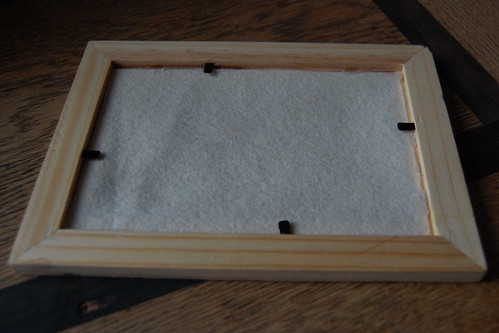
04 earring frame tutorial, a photo by het groene kamertje on Flickr.
The front looked like this:
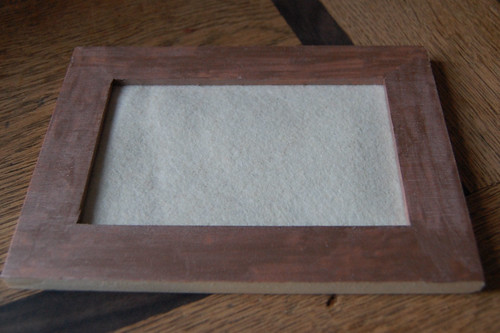
05 earring frame tutorial, a photo by het groene kamertje on Flickr.
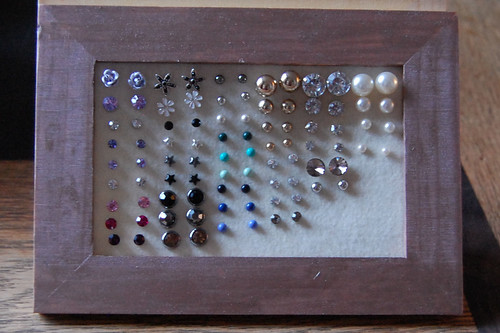
Now I only needed to pin all my studs through the felt. I actually had to push pretty hard (and now my fingers are sore!) but the felt and the glue held just fine. I like how I can take them out and rearrange them however I want, but that there won't be any visible holes in the felt.

before earring frame tutorial, a photo by het groene kamertje on Flickr.
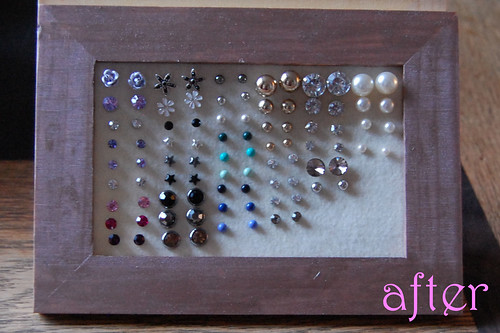
after earring frame tutorial, a photo by het groene kamertje on Flickr.
Ik liep al een tijdje te denken over een manier om mijn knopjes-oorbellen handig te organiseren (ze liggen nu in een grote berg) en vandaag had ik het opeens! Men neme een fotolijstje (deze is van Ikea); haal de achterkant, het 'ruitje' en alles wat er verder nog in zit eruit; versier het lijstje of niet (ik gebruikte heel professioneel *ahum* nagellak *ahum*); gebruik de kartonnen achterkant van het lijstje als mal om een stuk vilt uit te knippen; lijm het vilt in het lijstje; LAAT DROGEN (bijna vergeten!); en maak al je knopjes vast aan het vilt :)
Het leuke is dat je ze eruit kan halen en reorganiseren, maar je krijgt geen zichtbare gaatjes in het vilt!
also posted at:
adventuresofadiymom alliemakes
aannemarieshaakblog noriginalbelle askanna atozebracelebrations atthepicketfence avisiontoremember becolorful boogieboardcottage brassyapple C.R.A.F.T. cherishedbliss cherishedtreasures classyclutter coloursdekor craftenvy craftionary craftomaniac creatinmywaytosuccess creationsbykara delicateconstruction digitalscrapbooking diyhomesweethome diyshowoff
domesticallyspeaking etcetorize eyeheart faithgracecrafts
firefliesandjellybeans frenchcountrycottage getouttamyheadplease gingerbread happyhourprojects homework hopestudios ikblogjijblogt imtopsyturvy ishouldbemoppingthefloor itsahodgepodgelife itssoverycheri jaqsstudio katiesnestingspot ladybugblessings laughloveandcraft
linesacross lovelycraftyhome lovenotesbylauryn madincrafts makingtheworldcuter marvelouslymessy myuncommonsliceofsuburbia natashainoz nightowlcrafting notjustahousewife petitehermine pincushioncreations polkadotsonparade pollywantacrafter quiltstory raisingmemories reasonstoskipthehousework rhinestonebeagle
rookno17
sarahndipities sewwoodsy serendipityandspice serenityyou sewcando sewchatty sistersofthewildwest soverycreative stuffandnonsense sumossweetstuff sweetlittlegals
teaganstravels
thekurtzcorner thesoutherninstitute
thetrendytreehouse thewinthropchronicles toastiestudio twindragonflydesigns whilehewasnapping youngancrafty
kan je dat ook gebruiken voor hangende bellen ?
ReplyDeleteDat moet zeker kunnen, ik zou dan alleen wel een groter rekje of lijstje gebruiken want anders kunnen er maar een paar bellen in.
ReplyDeleteMisschien dat ze er wel wat makkelijker uit vallen, omdat er geen achterkantjes aan zitten.
tof idee!!!
ReplyDeleteWow! Thank you for sharing the idea. Now I can organize my earrings too :D
ReplyDeleteVisiting from withapinkie.blogspot.com
That a really cute idea...and it looks easy enough too! I'm so delighted that you shared it with us for Pearls and Lace Thursday! Welcome!
ReplyDeleteBlessings, Doni
This is such a creative idea! Thanks for sharing!
ReplyDeleteI am in love with this idea! I never wear a lot of my earrings because they are not visible. This would solve that problem. And I have everything to make it. Thanks so much for sharing at Terrific Tuesdays.
ReplyDeleteRachel
adventuresofadiymom.blogspot.com
This looks great! I really need to do something like this. I have earrings everywhere! :)
ReplyDeleteI have done something like this once, used burlap though. Yours looks great! Thanks for sharing.
ReplyDeletePerfect timing -- I just organized my wire earrings and needed an idea for the posts!
ReplyDeleteoh my!! that sure looks super easy to make!! wow! well done!! I'm going to try this too.. thanks for the inspiration.. I'm your newest follower.. and hoping to see loads of inspirations from you!! Happy blogging...
ReplyDeleteWhat a good idea! Thanks for linking up to Party Time at So Very Creative!
ReplyDeleteBrilliant! I'm featuring your post on my Facebook page today!
ReplyDeleteJenn/Rook No. 17
What a cute and easy solution! All my earring are jumbled in a bowl- I need to try this out so I can actually find them. Thanks for the inspiration. If you have some time I'd love it if you'd stop by my blog and check out the giveaway I'm having for a Ramsign Home sign!
ReplyDeleteGreat idea for storing all those earrings!
ReplyDeleteThanks for linking to a Round Tuit!
Hope you have a fabulous week!
Jill @ Creating my way to Success
http://www.jembellish.blogspot.com/
This is such a great idea! I have the same problem and would like to give this a try. Great tutorial! Thanks for linking up on Teagan's Travels. I hope you'll be able to join this week's party going on now.
ReplyDeletehttp://teaganstravels.blogspot.com/2012/04/destination-inspiration-linky-party-11.html
Thanks, Michelle @Teagan's Travels
Handig opgebergd zo, leuk en simpel!
ReplyDeleteThanks so much for linking this great idea up to my weekly Say G'Day Saturday Party. You are so clever to think of this! I'm going to share this on my facebook page!
ReplyDeleteI hope you will be able to join in and link up another fabulous post this weekend!
Best wishes,
Natasha in Oz
Wow, thanks for all the lovely comments and the features!
ReplyDeleteI find I actually wear my earrings a lot more often since I made this, so it's useful in more ways :)
This has been featured today on Serenity Saturday Link Party!
ReplyDeleteNatasha xxx
such a clever idea. I did something like this for my earrings too but I used that plastic stuff that you can find in the craft store for doing needlepoint. It also worked great for earrings. Jewelry organization ideas are something we are all looking for good ideas and solutions for. I am so happy you shared yours here at BeColorful
ReplyDeletepam
Great idea - I would probably wear different earrings more if I could see them all like this. Thanks for linking to Craftastic Monday at Sew Can Do:)
ReplyDeleteSuch a cute idea! I am definitely going to have to make one of these. I would love for you to share this at my link party
ReplyDeletehttp://thewinthropchronicles.blogspot.com/2012/04/share-it-link-party-8.html
Such neat way to organize your earrings! Plus, you really can't beat the price:)
ReplyDeleteWOW! Love this. So simple. I def. need to make this!
ReplyDeletehttp://fitcraftystylishandhappy.blogspot.com
Thanks :D
ReplyDeleteI agree, it would be hard to beat the price!
VERY COOL! Easy Breezy is the best projects!
ReplyDeletevisiting from Serendipity and Spice Party!
What a brilliant idea - love it!
ReplyDelete