This blog has moved to: www.studio-paars.nl

April 22, 2012

* Glasses cozy (with sort of a Tutorial)


I'm moving my blog; the new location of this post is: Studio Paars - DIY: sew an embroidered glasses cosy

Mijn blog verhuist; de nieuwe locatie van deze post is: Studio Paars - DIY: naai een geborduurd brillenhoesje

======================================================

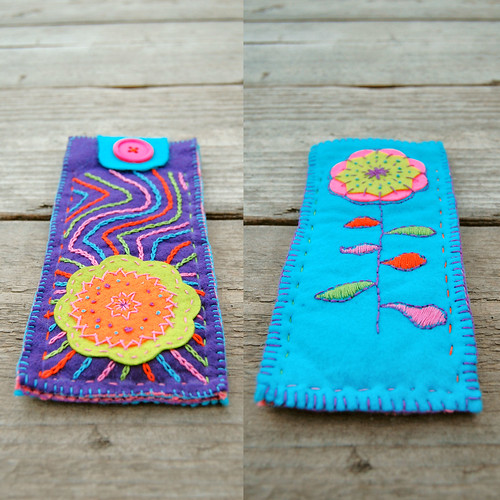
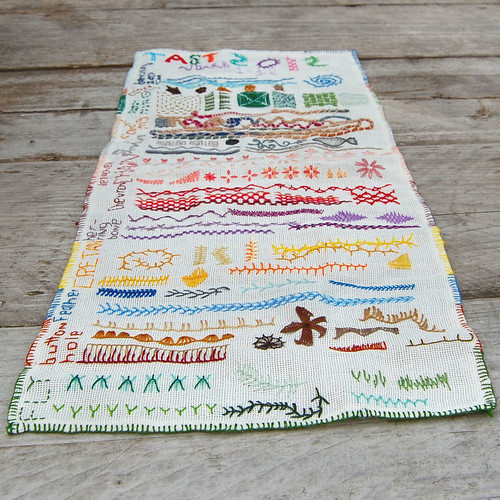
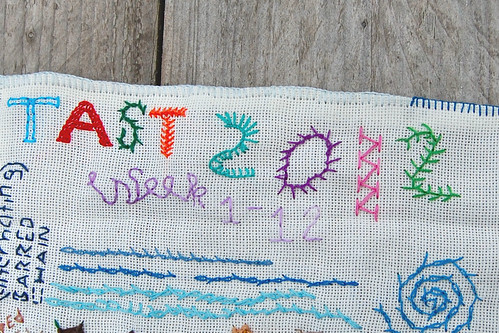
Somewhere last week I finished something I had been embroidering on for a while. I have been totally absorbed in embroidery sinde I first joined TAST at the beginning of this year and I have to admit, since finishing this piece I am just a little fed up with it. For now, because I'm sure it will come back!

Ergens vorige week heb ik iets afgemaakt waar ik al een heel tijdje op aan het borduren was. Ik ben helemaal into borduren sinds ik begon met TAST aan het begin van dit jaar, en ik moet eerlijk zeggen dat ik het, sinds deze af is, er wel een beetje mee heb gehad. Voor nu dan, want het komt vast wel weer terug!

case
case, a photo by het groene kamertje on Flickr.

I had intended this to be a Tutorial so when I started I took tons of pictures, but as it progressed I kept forgetting to make more. So now it's Sort Of A Tutorial.
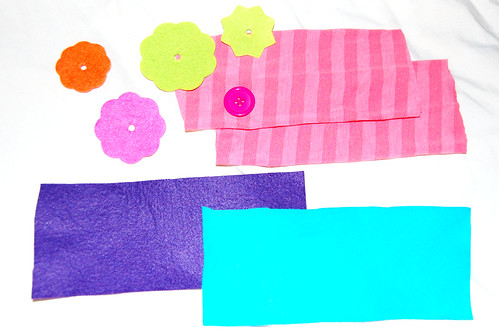
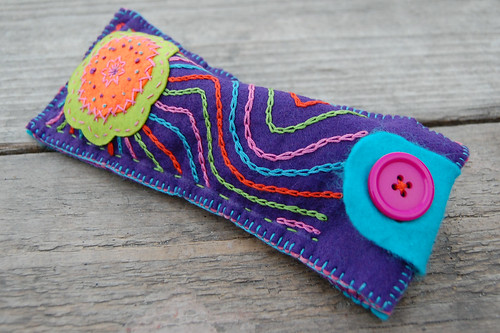
I started with two pieces of felt for the outside, and two pieces of a very soft fabric for the inside (to protect the glass), a button, a bit of felt for the tag with the buttonhole in it, and some felt shapes. All the felt and the button were part of a recent gift I received, and I liked the idea of using them together to create something really REALLY bright and colourful.

Dit had eigenlijk een Tutorial moeten worden, maar ik vergat steeds foto's te maken dus is het nu maar Een Soort Van Tutorial.
Ik begon met 2 lapjes vilt voor de buitenkant, 2 hele zachte stukjes stof voor de binnenkant, een klein stukje vilt voor het flapje met het knoopsgat, en wat vilten vormpjes. Al het vilt en de knoop waren deel van een heel lief kadotje dat ik laatst kreeg, dus ik wilde ze graag samen gebruiken voor iets heel, HEEL kleurigs.

case 1
case 1, a photo by het groene kamertje on Flickr.
case 2
case 2, a photo by het groene kamertje on Flickr.

First I embellished the felt pieces (here's where I forgot to take pics). This took up the most time.
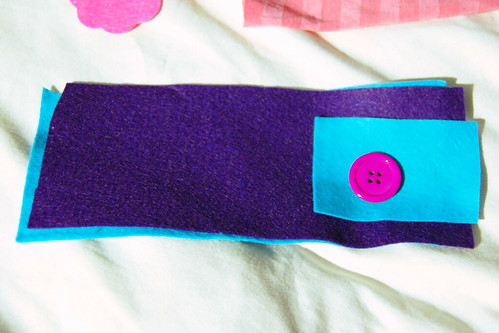
Then I used a buttonhole stitch to sew each layer of felt to a layer of the fabric for the lining. On one of them I  sewed the tag piece by placing it between the two layers before stitching.

Eerst versierde ik het vilt (hier heb ik dus geen foto's van), dit koste me de meeste tijd.
Daarna naaide ik met een festonsteek elk lapje vilt op een lapje van de voeringstof. Tussenuit 1 ervan naaide ik het flapje voor de sluiting.

case 3
case 3, a photo by het groene kamertje on Flickr.

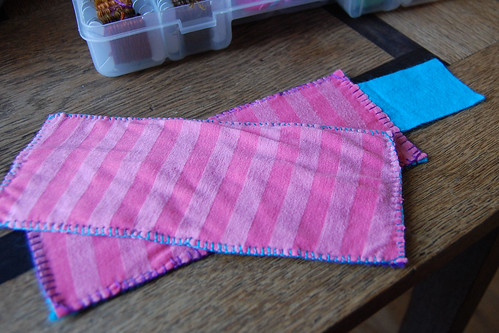
Then I used a simple running stitch to stitch everything together, leaving open one of the shorter sides, and a bit extra down the longer sides (for easy access).

Daarna naaide ik de twee delen met een stiksteek op elkaar, maar liet 1 van de korte kanten open, samen met een klein stikje van de lange kanten (om makkelijk de bril eruit te kunnen halen).

case 5
case 5, a photo by het groene kamertje on Flickr.

Lastly I cut the buttonhole in the tag and sewed the button in place. I have to admit I'm not completely happy with this bit, might have to change it someday.

Als laatste knipte ik het knoopsgat in het flapje en naaide de knoop op z'n plaats. Ik ben hier niet helemaal tevreden over, misschien dat ik dit nog eens zal aanpassen.

case  4
case 4, a photo by het groene kamertje on Flickr.

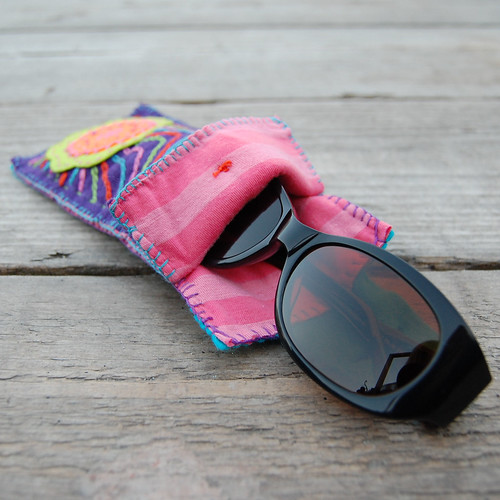
It's not exactly a glasses case (more of a glasses cozy) since there's no padding, but all the felt and fabric layers make it pretty sturdy so I feel comfortable putting my glasses in there.

Het is niet helemaal een brillendoos (meer een brillenmapje), aangezien er geen vulling in zit, maar alle lagen stof en vilt maken het toch een vrij stevig geheel dus ik heb wel het idee dat mijn brillen er veilig in zijn.

case 6
case 6, a photo by het groene kamertje on Flickr.
case 7
case 7, a photo by het groene kamertje on Flickr.
What do you think?

Wat vind je ervan?


also posted at:
504main anoriginalbelle annemarieshaakblog askanna atozebracelebrations atthepicketfence avisiontorememberb becolorful boogieboardcottage C.R.A.F.T. cherishedbliss cherishedtreasures classyclutter coloursdekor craftionary craftomaniac creatingmywaytosuccess creativeitch delicateconstruction DIYhomesweethome etcetorize eyeheart firefliesandjellybeans freckledlaundry frenchcountrycottage getouttamyheadplease gingerbread happyhourprojects homework hopestudios ishouldbemoppingthefloor itsahodgepodgelife itssoverycheri jaqsstudio ladybugblessings laughloveandcraft linesacross lovelycraftyhome lovenotesbylauryn madincrafts makingtheworldcuter marvelouslymessy nightowlcrafting notjustahousewife petitehermine pincushioncreations pollywantacrafter quiltstory raisingmemories rhinestonebeagle rookno17 sarahndipities serendipityandspice serenityyou sewcando sewchatty sewwoodsy sistersofthewildwest soverycreative stuffandnonsense sumossweetstuff sweetlittlegals thecreativeitch thekurtzcorner thesoutherninstitute thewinthropchronicles threadingmyway toastiestudio twindragonflydesigns whilehewasnapping youngancrafty 


April 13, 2012

~I'm on the DaWanda blog!


My earring frame tutorial is featured on the DaWanda Blog! Yay! Have a look and check it out!

And while you're at it, check out their Facebook fanpage, my Facebook page and my DaWanda shop too :)
Logo_200x83
DaWanda features me!

Mijn oorbellenrekje tutorial staat op de DaWanda Blog! Yay! Neem even een kijkje!

En als je dan toch bezig bent, kijk ook even op hun Facebook fanpage, mijn Facebook pagina en mijn DaWanda winkelje :)


April 9, 2012

* Earring stand tutorial

->I'm moving my blog; the new location of this post is Studio Paars - DIY: make an earring stand from a photo frame
->Mijn blog verhuist; de nieuwe locatie van deze post is Studio Paars - DIY: maak een oorbellenrekje van een fotolijst

+=+=+=+=+=+=+=+=+=+=+=+=+=+

(psssst.... remember to check out my Giveaway! )

06 earring frame tutorial
I have been thinking for a while about a way to organise my earrings; I have a ton of these tiny studs that I wear a lot and they look something like this:

01 earring frame tutorial
And today the solution just hit me! (While sorting out the mess that keeps accumulating in our bedroom, of all things.) Ofcourse I had to go and make it straight away :)

So here is what you will need:
- a small picture frame
- a piece of felt
- some glue
- optional: some embellishments like paint, glue, paper, fabric, ribbon, beads, buttons, anything really!

I used this el cheapo frame from Ikea. First take it apart to check if the glass isn't attached to the frame. This one only had a loose bit of clear plastic. Take everything out, leaving only the bare frame. Now embellish! Let your imagination go wild, or leave it blank, whatever you like. I used some old nailpolish very exclusive paint to give mine some colour and some shine.

02 earring frame tutorial

Now cut out a piece of felt to fit in the frame. Use the cardboard backing as a template.

03 earring frame tutorial

Now carefully glue the felt in the frame. I applied the glue sparingly to the inside of the frame, placed the felt on top of the glue, and then I placed the cardboard backing back into the frame to give it some stability while it dried. After a few hours I carefully removed the backing which had ofcourse become glued to the frame and ended up with this:

04 earring frame tutorial

The front looked like this:

05 earring frame tutorial

Now I only needed to pin all my studs through the felt. I actually had to push pretty hard (and now my fingers are sore!) but the felt and the glue held just fine. I like how I can take them out and rearrange them however I want, but that there won't be any visible holes in the felt.

before earring frame tutorial
after earring frame tutorial

Ik liep al een tijdje te denken over een manier om mijn knopjes-oorbellen handig te organiseren (ze liggen nu in een grote berg) en vandaag had ik het opeens! Men neme een fotolijstje (deze is van Ikea); haal de achterkant, het 'ruitje' en alles wat er verder nog in zit eruit; versier het lijstje of niet (ik gebruikte heel professioneel *ahum* nagellak *ahum*); gebruik de kartonnen achterkant van het lijstje als mal om een stuk vilt uit te knippen; lijm het vilt in het lijstje; LAAT DROGEN (bijna vergeten!); en maak al je knopjes vast aan het vilt :)
Het leuke is dat je ze eruit kan halen en reorganiseren, maar je krijgt geen zichtbare gaatjes in het vilt!


also posted at:
adventuresofadiymom alliemakes aannemarieshaakblog noriginalbelle askanna atozebracelebrations atthepicketfence avisiontoremember becolorful boogieboardcottage brassyapple C.R.A.F.T. cherishedbliss cherishedtreasures classyclutter coloursdekor craftenvy craftionary craftomaniac creatinmywaytosuccess creationsbykara delicateconstruction digitalscrapbooking diyhomesweethome diyshowoff domesticallyspeaking etcetorize eyeheart faithgracecrafts firefliesandjellybeans frenchcountrycottage getouttamyheadplease gingerbread happyhourprojects homework hopestudios ikblogjijblogt imtopsyturvy ishouldbemoppingthefloor itsahodgepodgelife itssoverycheri jaqsstudio katiesnestingspot ladybugblessings laughloveandcraft linesacross lovelycraftyhome lovenotesbylauryn madincrafts makingtheworldcuter marvelouslymessy myuncommonsliceofsuburbia natashainoz nightowlcrafting notjustahousewife petitehermine pincushioncreations polkadotsonparade pollywantacrafter quiltstory raisingmemories reasonstoskipthehousework rhinestonebeagle rookno17 sarahndipities sewwoodsy serendipityandspice serenityyou sewcando sewchatty sistersofthewildwest soverycreative stuffandnonsense sumossweetstuff sweetlittlegals teaganstravels thekurtzcorner thesoutherninstitute  thetrendytreehouse thewinthropchronicles toastiestudio twindragonflydesigns whilehewasnapping youngancrafty


April 2, 2012

* TAST 2012 #13

->I'm moving my blog; the new location of this post is Studio Paars - Embroidery stitches: TAST 2012 week #13
->Mijn blog verhuist; de nieuwe locatie van deze post is Studio Paars - Borduursteken: TAST 2012 week #13

+=+=+=+=+=+=+=+=+=+=+=+=+=+

Week 13 of Take A Stitch Tuesday. This week: Catch-up Week.
I decided this was a good opportunity for me to finish my sampler of the first 12 stitches, since I was almost running out of cloth anyway. I finished the buttonhole edging and stitched the lettering. Since I limited myself so far each week by using only one colour for one stitch, I went a little overboard this time and used as many stitches and colours as possible :) I like the way it feels a little bit crazy!
Now to figure out what to do with my sampler. It's a little too big to make into a stitchbook of some kind, and I don't really intend on displaying it yet. Maybe someday when I have an actual craft room...

P.S. remember to check out my Giveaway!

Week 12 van Take A Stitch Tuesday. Catch-up Week.
Ik had niets in te halen dus ik vond deze week een goede gelegenheid om mijn sampler (EDIT: merklap?!) van de eerste 12 weken af te maken. Ik maakte het festonneerwerk rond de randen af en borduurde de letters. Tot nu toe gebruikte ik elke week maar 1 kleur voor 1 steek, dus deze week sloeg ik een klein beetje door en gebruikte zoveel steken en kleuren als ik maar kon. Ik vind het effect wel prettig gestoord eigenlijk :)
Nu te besluiten wat ik ermee zal doen. Het is te groot om er een soort boekje van te maken, en ik was ook niet echt van plan om het op te hangen. Maar misschien ooit als ik een echt knutselkamertje heb...

P.S. vergeet niet om even naar mijn Giveaway te kijken!

tast 2012 #13 week 1-12 sampler

also posted at:
pintangle creatingmywaytosuccess becolorful etcetorize whilehewasnapping lovelycraftyhome petitehermine itssoverycheri cherishedtreasures itsoverflowing sistersofthewildwest craftenvy serenityyou reasonstoskipthehousework imtopsyturvy thekurtzcorner rookno17 teaganstravels adventuresofadiymom sweetlittlegals sewwoodsy katiesnestingspot alliemakes firefliesandjellybeans rhinestonebeagle happyhourprojects gingerbread heathernow natashainoz C.R.A.F.T. boogieboardcottage sewcando makingtheworldcuter sumossweetstuff sewchatty toastiestudio serendipityandspice soverycreative coloursdekor laughloveandcraft jaqsstudio thetrendytreehouse creationsbykara twindragonflydesigns digitalscrapbooking lovenotesbylauryn thesoutherninstitute linesacross diyhomesweethome quiltstory thecreativeitch notjustahousewife ladybugblessings cherishedbliss homework atozebracelebrations thewinthropchronicles sweetlittlegals nightowlcrafting avisiontoremember youngancrafty classyclutter craftomaniac askanna eyeheart sarahndipities anoriginalbelle pollywantacrafter threadingmyway commonground delicateconstruction annemarieshaakblog atthepicketfence ishouldbemoppingthefloor


April 1, 2012

* Lavender cuff


I'm moving my blog; the new location of this post is: Studio Paars - Lavender cuff

Mijn blog verhuist; de nieuwe locatie van deze post is: Studio Paars - Cuff-armband lavendel

======================================================

Another felt cuff.
This one is a lavender-ish purple with white, pink and dark purple stitching, lined with light grey felt and closes with a pink vintage button.
As the others, this one was also inspired by Take A Stitch Tuesday.
EDIT: it's now for sale in my Dawanda shop!

P.S. remember to check out my Giveaway!


Weer een vilten 'cuff'.
Deze keer in lavendel blauw-paars met wit, roze en donkerpaars borduursel, gevoerd met lichtgrijs vilt en sluit met een roze 'vintage' knoop.
Net als de vorige werd ook deze geinspireerd door 'Take A Stitch Tuesday'.
EDIT: nu te koop in mijn Dawanda winkeltje!

P.S. vergeet niet om even naar mijn Giveaway te kijken!


felt cuff 'lavender' [#5]

also posted at:
thesoutherninstitute linesacross sewcando makingtheworldcuter toastiestudio creatingmywaytosuccess becolorful etcetorize petitehermine whilehewasnapping lovelycraftyhome cherishedtreasures sistersofthewildwest craftenvy quiltstory thecreativeitch imtopsyturvy thekurtzcorner rookno17 teaganstravels adventuresofadiymom sweetlittlegals thetraintocrazy katiesnestingspot firefliesandjellybeans alliemakes happyhourprojects bluebirdsews serenityyou gingerbread heathernow natashainoz itssoverycheri boogieboardcottage C.R.A.F.T. sumossweetstuff sewchatty serendipityandspice soverycreative coloursdekor laughloveandcraft jaqsstudio thetrendytreehouse creationsbykara sewwoodsy twindragonflydesigns rhinestonebeagle digitalscrapbooking lovenotesbylauryn linesacrossmyface threadingmyway commonground avisiontoremember youngancrafty classyclutter eyeheart nightowlcrafting atthepicketfence ishouldbemoppingthefloor