


This blog is no longer active.
I am gradually moving my old posts to my new website; I hope you will come over to have a look: www.studio-paars.nl

October 20, 2016
July 23, 2015
* Hoops!
->I'm moving my blog; the new location of this post is Studio Paars - Hoops!
->Mijn blog verhuist; de nieuwe locatie van deze post is Studio Paars - Geborduurde (baby) naam
+=+=+=+=+=+=+=+=+=+=+=+=+=+
Hello little blog. I'm sorry for neglecting you.
I know I have been spending way too much time on Instagram lately. And also I've been crafting like a maniac, because in a few weeks I'm doing a craft fair!
Well, it's a tiny market really. I think. It's new so I have no idea how big it will be.
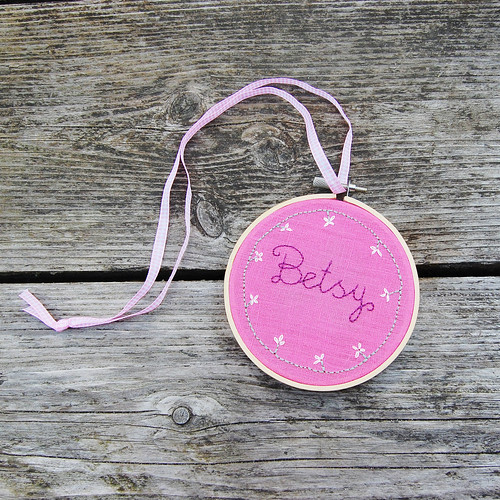
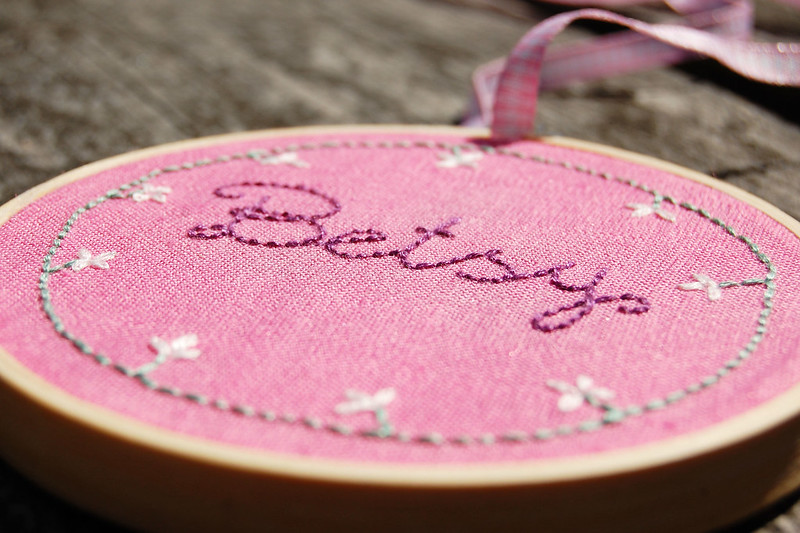
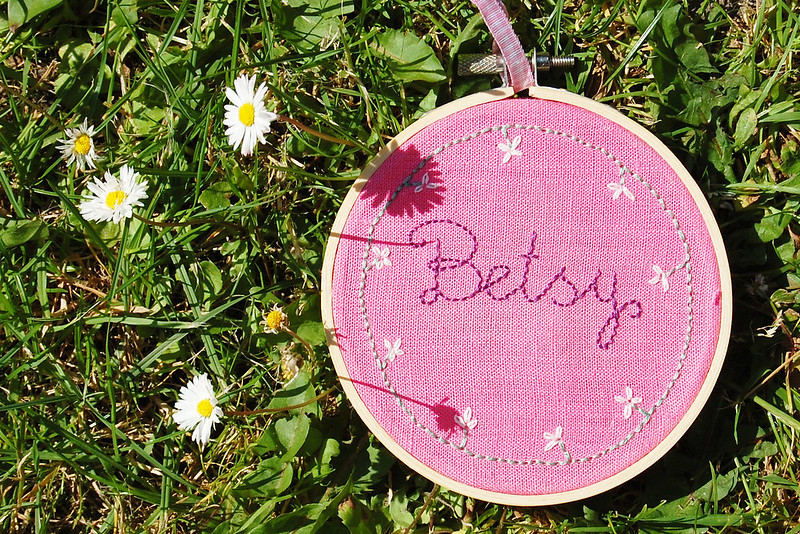
Anyway, just wanted to show a little something (the first of a lot more I hope) I made recently. I was seeing all the lovely embroidered hoops everywhere and after some doubts I finally started making my own. They are so much fun to make!
They would look lovely in any nursery and make the perfect personal gift for any parent-to-be, embroidered with the baby's name and (optional) date of birth etc.
I am now considering selling custom name hoops on my Etsy shop; not sure how to go about that though. Any tips?
Hallo! *zwaai* Lang niet gezien!
Ik breng veel te veel tijd door op Instagram...
Ook ben ik druk aan het maken voor een handmade marktje waar ik ga staan begin augustus (ben je op 9 augustus in de buurt van Zoetermeer? Kom dan kijken!)
Ik wilde in elk geval graag alvast deze laten zien: een voorbeeld van een custom borduurring met (baby) naam. Ik maak deze op aanvraag. Superleuk voor in de babykamer of als cadeau voor aanstaande ouders!
Ik wil ze gaan aanbieden in mijn Etsy shop maar ik weet niet precies hoe ik dat het best aan kan pakken; heb je misschien tips voor me?

->Mijn blog verhuist; de nieuwe locatie van deze post is Studio Paars - Geborduurde (baby) naam
+=+=+=+=+=+=+=+=+=+=+=+=+=+
Hello little blog. I'm sorry for neglecting you.
I know I have been spending way too much time on Instagram lately. And also I've been crafting like a maniac, because in a few weeks I'm doing a craft fair!
Well, it's a tiny market really. I think. It's new so I have no idea how big it will be.
Anyway, just wanted to show a little something (the first of a lot more I hope) I made recently. I was seeing all the lovely embroidered hoops everywhere and after some doubts I finally started making my own. They are so much fun to make!
They would look lovely in any nursery and make the perfect personal gift for any parent-to-be, embroidered with the baby's name and (optional) date of birth etc.
I am now considering selling custom name hoops on my Etsy shop; not sure how to go about that though. Any tips?
Hallo! *zwaai* Lang niet gezien!
Ik breng veel te veel tijd door op Instagram...
Ook ben ik druk aan het maken voor een handmade marktje waar ik ga staan begin augustus (ben je op 9 augustus in de buurt van Zoetermeer? Kom dan kijken!)
Ik wilde in elk geval graag alvast deze laten zien: een voorbeeld van een custom borduurring met (baby) naam. Ik maak deze op aanvraag. Superleuk voor in de babykamer of als cadeau voor aanstaande ouders!
Ik wil ze gaan aanbieden in mijn Etsy shop maar ik weet niet precies hoe ik dat het best aan kan pakken; heb je misschien tips voor me?
June 4, 2015
* A fiber artsy finish
->I'm moving my blog; the new location of this post is Studio Paars - A fiber artsy finish
->Mijn blog verhuist; de nieuwe locatie van deze post is Studio Paars - “Fiber Art” experimentje
+=+=+=+=+=+=+=+=+=+=+=+=+=+
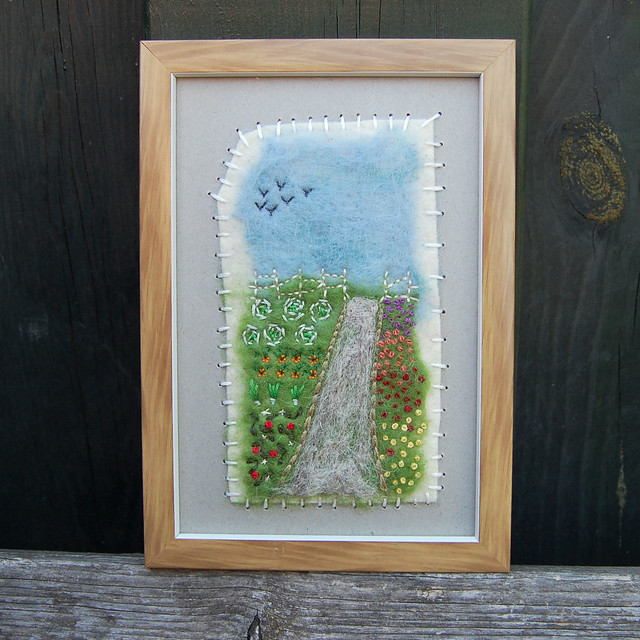
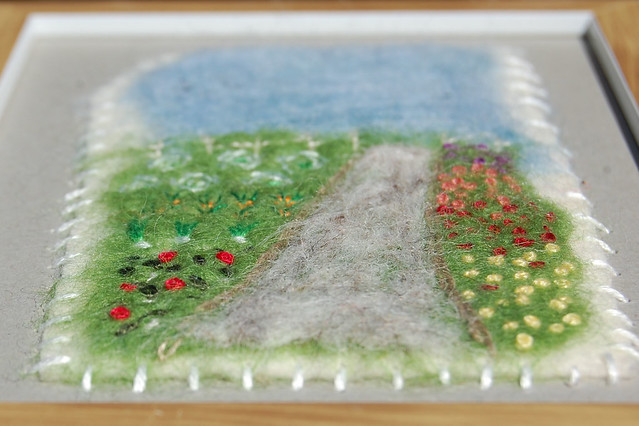
I finished this little fellow! (WIP photos here)
It started as a little experiment but I like the result so much I decided to frame it and hopefully someday it will get to be on display in my craft room. Imaginary craft room, that is.
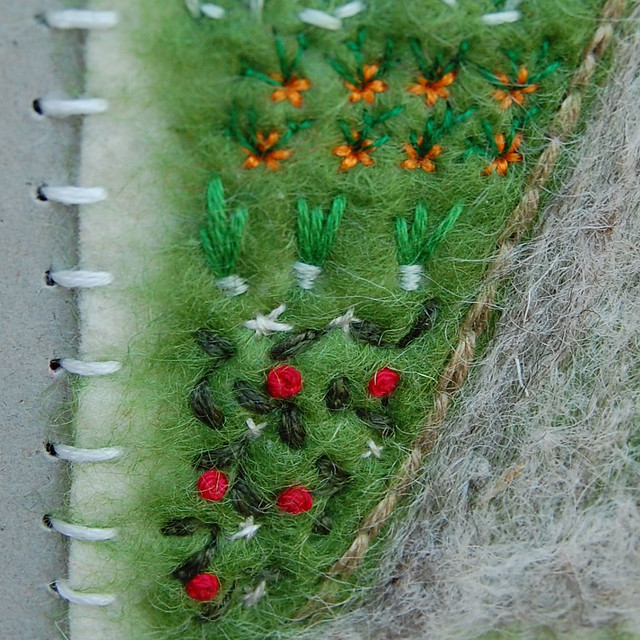
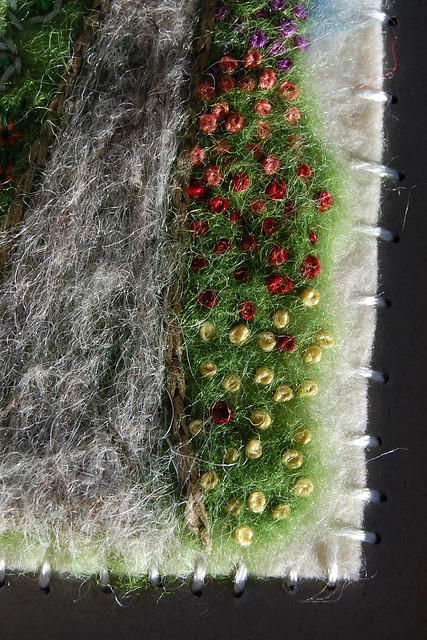
I started with a little scrap of wool felt. I randomly placed some scrap wool roving and lightly needle felted it to the surface. It started to look like a landscape to me so I embroidered the birds and the fence. Then it started to become a garden so I embroidered the edges of the path and needle felted the natural wool to resemble gravel. Then came the french knot (or colonial knot; I don't remember) flower beds, and last came the vegetable patch.
I love it! I feel unreasonably proud of this little thing actually *grins*
I think the combination of techniques and materials worked really well. The needle felted wool has a slightly transparant look, not unlike watercolor. And the whole thing has great texture too.
The scale is a little off though; it's too big to be turned into a brooch and too small to be anything else. So I sewed it into a picture frame to make it easier to display.
I will be experimenting further with this. Maybe next time I will try adding fabric to the mix.
Deze is klaar! (WIP foto's hier)
Gemaakt met een restje wolvilt, wat restjes lontwol erover gelegd en lichtjes met de naald erop gevilt en vervolgens geborduurd.
->Mijn blog verhuist; de nieuwe locatie van deze post is Studio Paars - “Fiber Art” experimentje
+=+=+=+=+=+=+=+=+=+=+=+=+=+
 |
| Fiber Art Thingy |
I finished this little fellow! (WIP photos here)
It started as a little experiment but I like the result so much I decided to frame it and hopefully someday it will get to be on display in my craft room. Imaginary craft room, that is.
I started with a little scrap of wool felt. I randomly placed some scrap wool roving and lightly needle felted it to the surface. It started to look like a landscape to me so I embroidered the birds and the fence. Then it started to become a garden so I embroidered the edges of the path and needle felted the natural wool to resemble gravel. Then came the french knot (or colonial knot; I don't remember) flower beds, and last came the vegetable patch.
I love it! I feel unreasonably proud of this little thing actually *grins*
I think the combination of techniques and materials worked really well. The needle felted wool has a slightly transparant look, not unlike watercolor. And the whole thing has great texture too.
The scale is a little off though; it's too big to be turned into a brooch and too small to be anything else. So I sewed it into a picture frame to make it easier to display.
I will be experimenting further with this. Maybe next time I will try adding fabric to the mix.
Deze is klaar! (WIP foto's hier)
Gemaakt met een restje wolvilt, wat restjes lontwol erover gelegd en lichtjes met de naald erop gevilt en vervolgens geborduurd.
 |
| closeup |
 |
| detail |
 |
| detail |
 |
| texture |
 |
| layers |
linked at these parties:
Bee A Crafter XD {Crafting Along} ~ Oombawka Design {Link And Share Wednesday} ~ Wondermom Wannabe {This Is How We Roll Thursday} ~ Super Mom - No Cape! {Stitchery Link Party}
Bee A Crafter XD {Crafting Along} ~ Oombawka Design {Link And Share Wednesday} ~ Wondermom Wannabe {This Is How We Roll Thursday} ~ Super Mom - No Cape! {Stitchery Link Party}
May 24, 2015
* DIY: vintage button necklace
I'm moving my blog; the new location of this post is: Studio Paars
Mijn blog verhuist; de nieuwe locatie van deze post is: Studio Paars
======================================================
A couple of days ago I posted this on Instagram:
Een paar dagen geleden liet ik dit zien op Instagram:
Here is what I made that day:
Dit is wat ik maakte die dag:
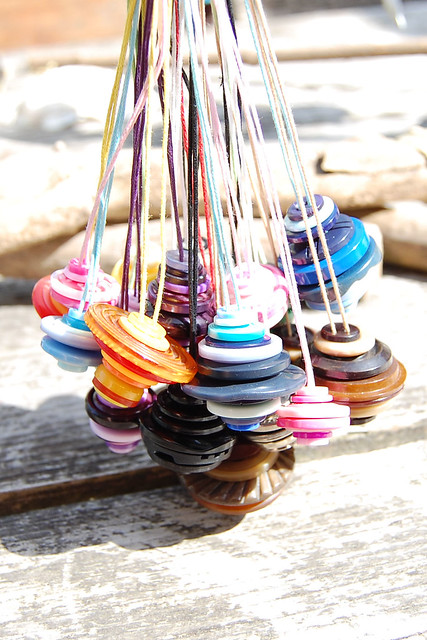
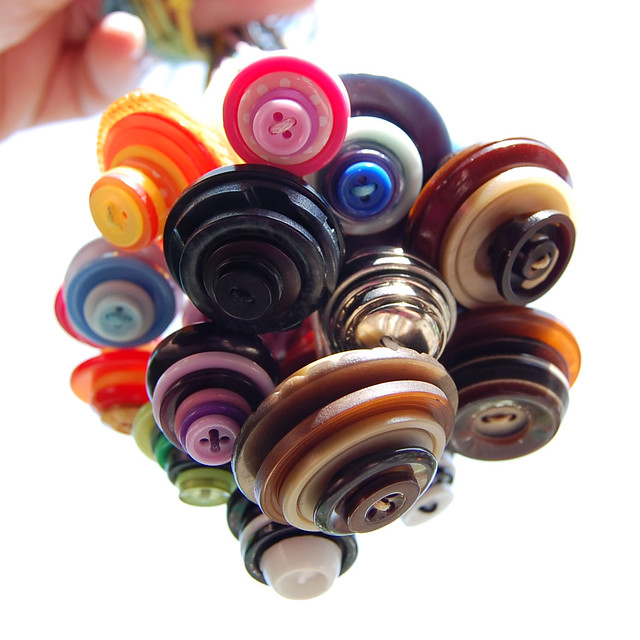
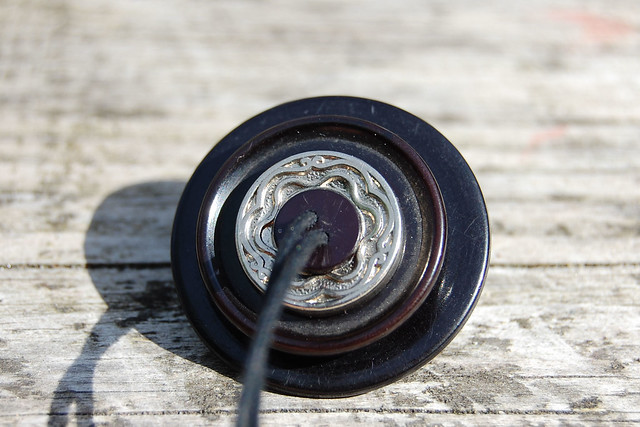
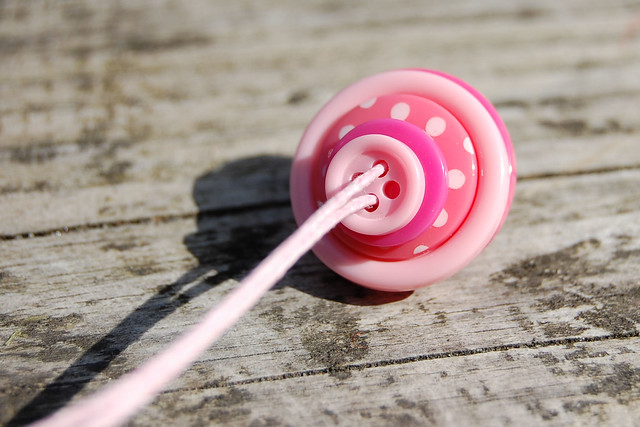
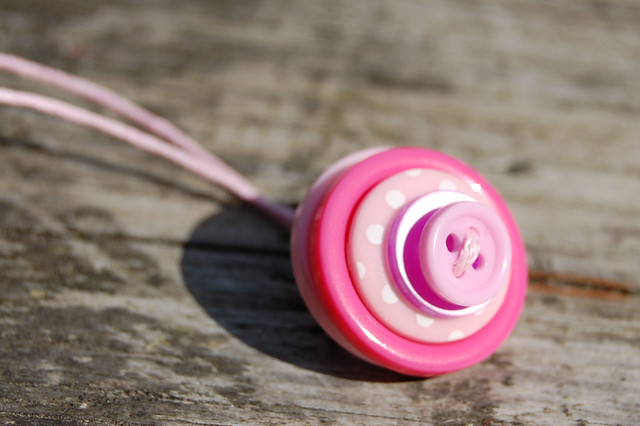
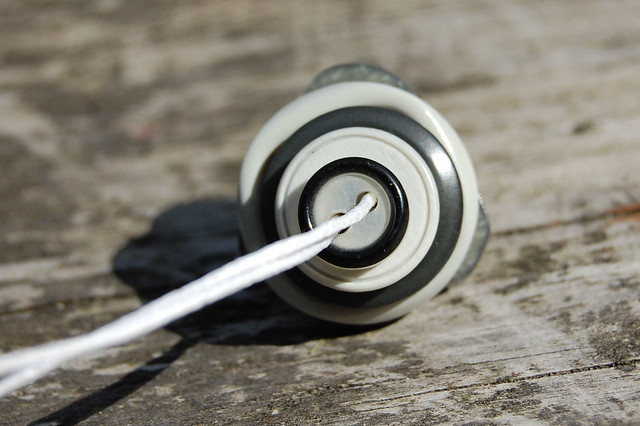
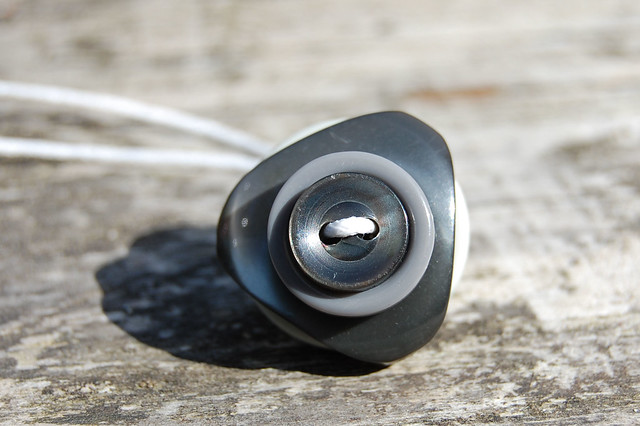
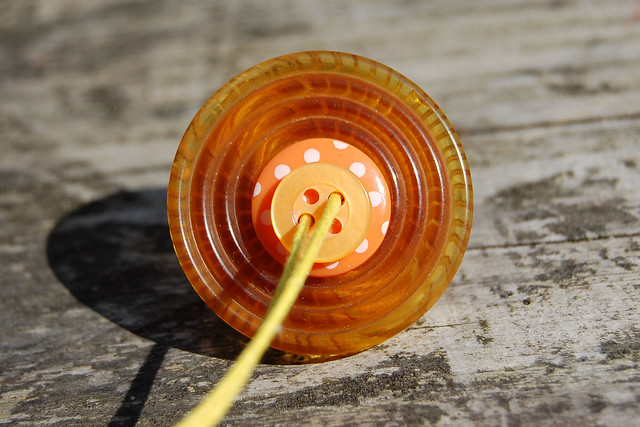
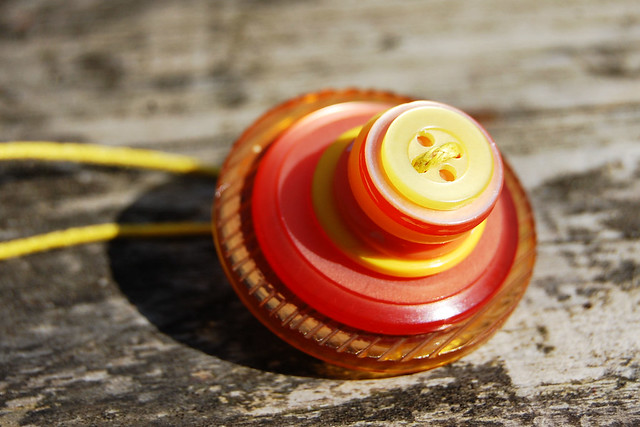
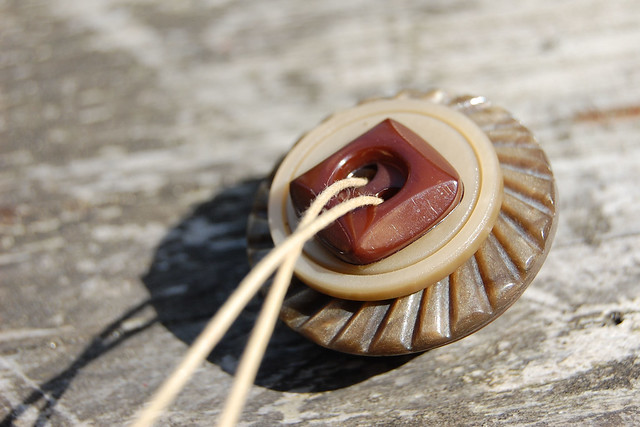
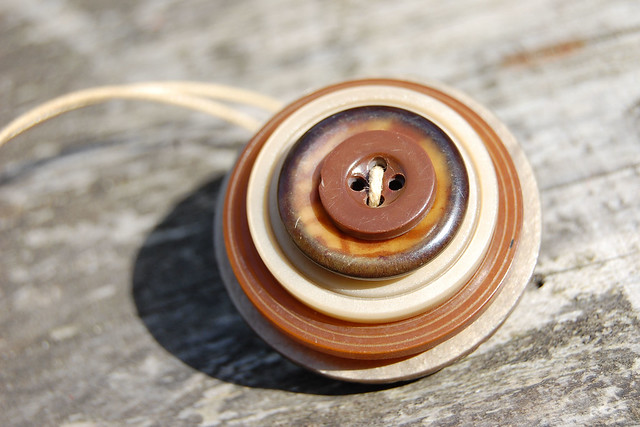
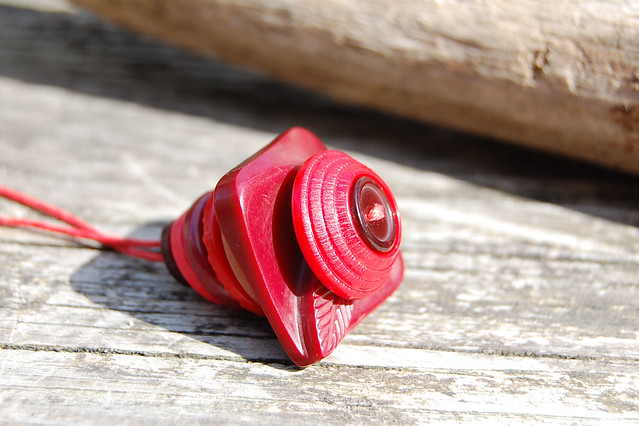
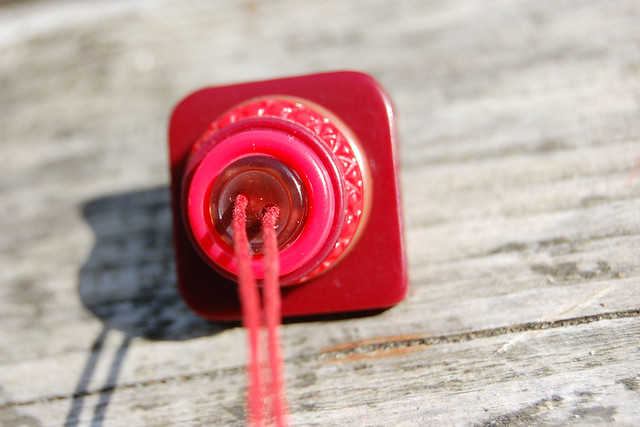
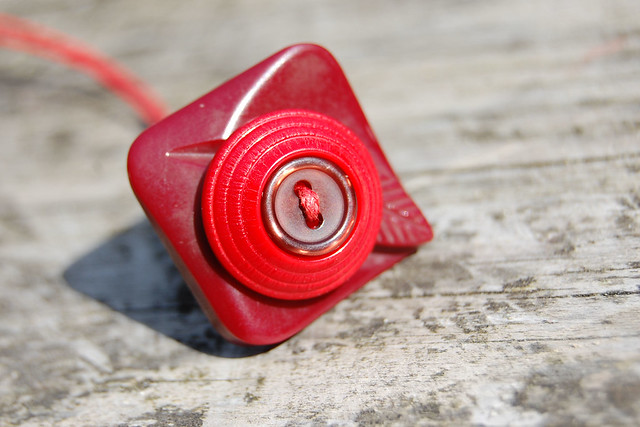
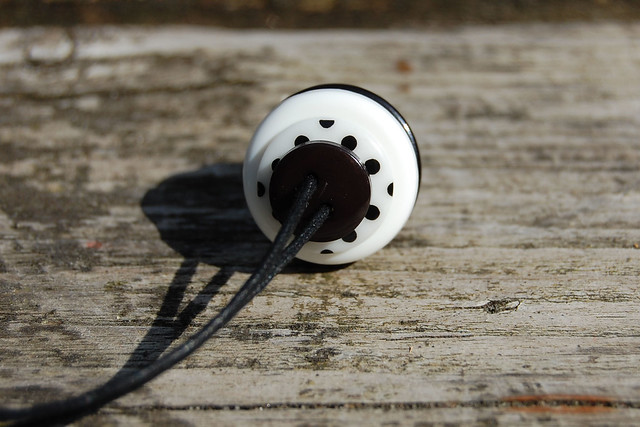
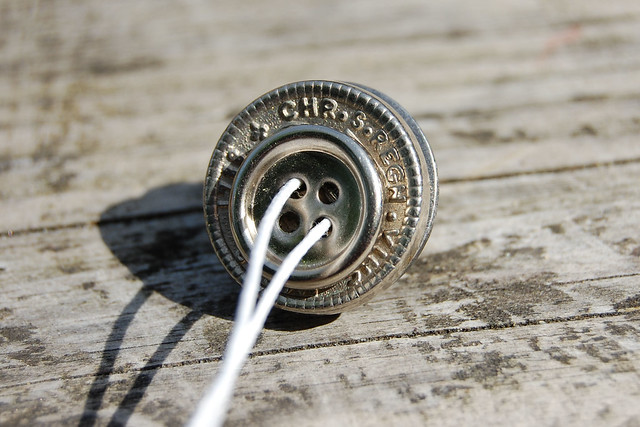
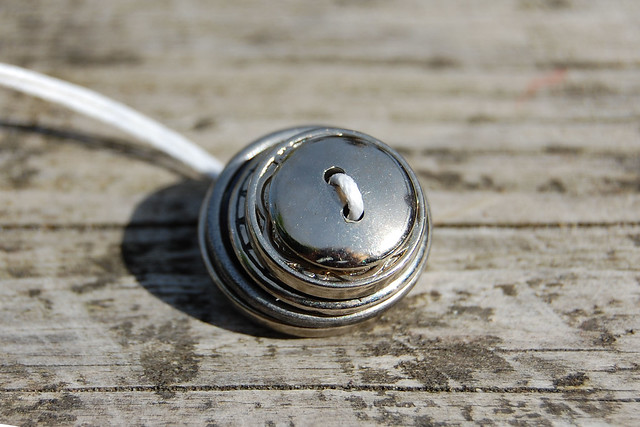
Button necklaces!
They are really easy to make, and so much fun! You could easily make these with kids too. Just choose some pretty buttons and string them. I used waxed cotton cord in matching colors, but you could use yarn, linen, hemp or silk if you're feeling super fancy. The hardest part is choosing the buttons!
I used a mixture of new buttons and vintage ones. Some of those are quite old and I think some might be bakelite. They get to stand out now, instead of being buried in the bottom of my button jars.
Knopenkettingen!
Supermakkelijk te maken, en superleuk! Je kan ze makkelijk met kinderen maken, of gewoon zelf. Kies een paar mooie knopen en rijg ze aan een touwtje. Ik gebruikte katoenen waxkoord in bijpassende kleurtjes, maar je kan ook wol gebruiken, linnen of hennep koord of (als je echt heel chic wil doen) zijde. Het moeilijkste is om de knopen te kiezen!
Ik gebruikte vintage en nieuwe knopen door elkaar. Sommige zijn heel oud en ik denk dat er een paar van bakeliet tussen zitten. Nu stelen ze de show, in plaats van onderin mijn knopenpotten te blijven liggen.
I'm thinking of having a little givewaway for some of these. What do you think?
Ik denk erover om een giveaway te doen voor een paar van ze, wat denk jij?


linked at these parties:
A To Zebra Celebrations {Link Party Tuesday} ~ Bee A Crafter XD {Crafting Along} ~ Oombawka Design {Link And Share Wednesday} ~ The Dedicated House {Before & After Wednesday} ~ Wondermom Wannabe {This Is How We Roll Thursday}
A To Zebra Celebrations {Link Party Tuesday} ~ Bee A Crafter XD {Crafting Along} ~ Oombawka Design {Link And Share Wednesday} ~ The Dedicated House {Before & After Wednesday} ~ Wondermom Wannabe {This Is How We Roll Thursday}
May 14, 2015
* Instagram & Embroidery: the Couched Filling Stitch
I'm moving my blog; the new location of this post is: Studio Paars
Mijn blog verhuist; de nieuwe locatie van deze post is: Studio Paars
======================================================
Hello there :) I am happy to *finally* be able to invite you to my Instagram feed!
My phone hated the IG app but eventually I convinced it to make it work. So that's where I have been these past few days. I am still discovering some of the features but I like that it is simple and fast, so I expect to be posting lots of WIP-shots there.
So if you would like to, come have a look! Leave your name in the comments if you would like me to do the same. I am @audrey_studiopaars over there.
Hallo :) Ik ben zo blij dat ik *eindelijk* mensen mijn Instagram feed kan laten zien!
Mijn telefoon had geloof ik een hekel aan de IG app, maar na heel veel proberen is het me toch gelukt om hem werkend te krijgen. Dus daar was ik de afgelopen dagen. Ik heb nog niet alles helemaal door maar ik vind het leuk dat het zo makkelijk en snel is, dus ik denk dat ik daar veel WIP-foto's zal plaatsen.
Dus als je zin hebt, kom even bij me kijken! Zet je naam in de comments als je wilt dat ik ook bij jou langskom. Ik ben daar @audrey_studiopaars.
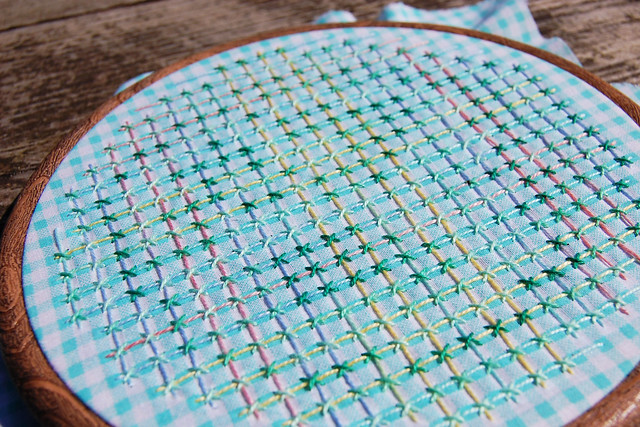
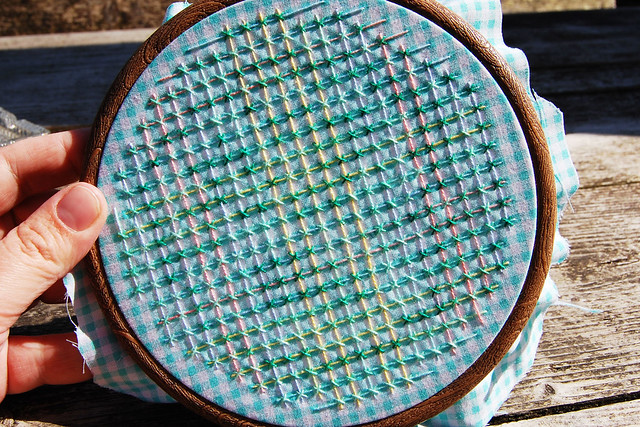
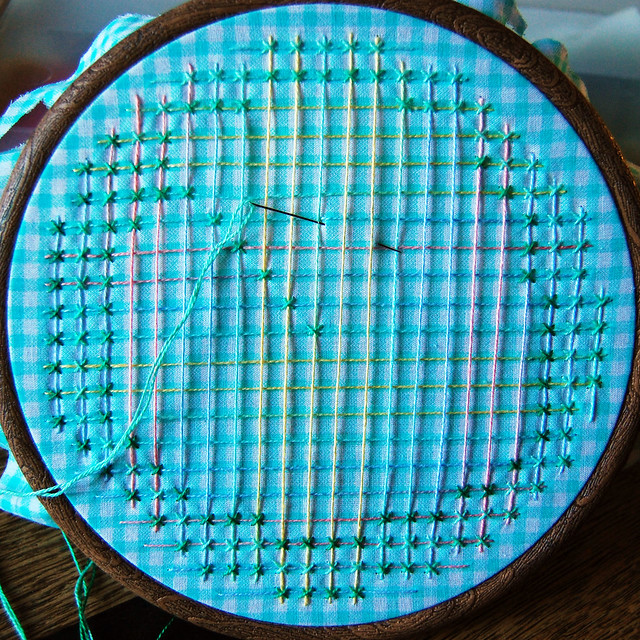
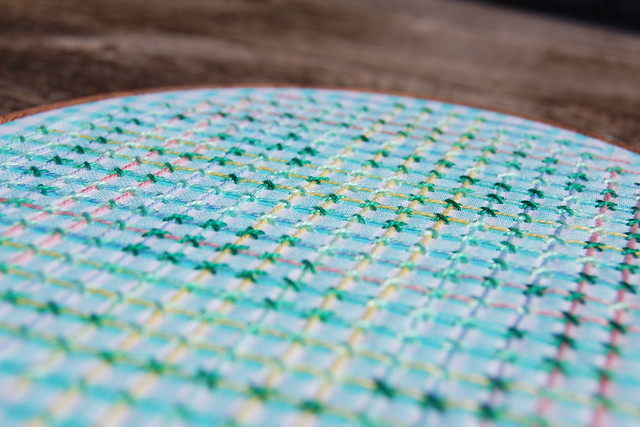
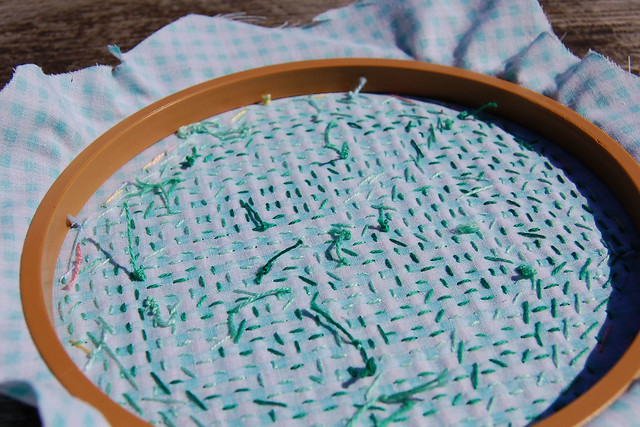
Anyway. I did a little embroidery inspired by this post on the wonderful Feeling Stitchy blog. This is called the Couched Filling Stitch and it is very easy - follow the link to their post for a very detailed tutorial.
I used some gingham fabric (which also meant I didn't need to draw any lines) and played with multocoloured thread.
Maar goed. Ik heb een beetje geborduurd, geïnspireerd door deze post op het super Feeling Stitchy blog. Het heet "the Couched Filling Stitch" (geen idee wat de nederlandse naam is) en het is heel eenvoudig - volg de link naar hun post voor een uitgebreide tutorial (in het engels maar met duidelijke foto's).
Ik gebruikte ruitjesstof (dus hoefde ik ook geen lijntjes te tekenen) en speelde wat met multikleurig garen.
A WIP shot.
Een WIP (Work In Progress - Werk In Uitvoering) foto.
Close up:

The back:
De achterkant:
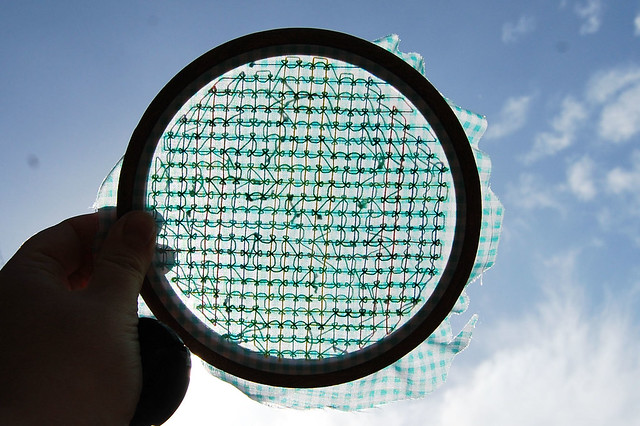
And I kind liked the way it looked against the light:
En ik vond het er heel grappig uitzien tegen het licht:
linked at these parties:
A To Zebra Celebrations {Link Party Tuesday} ~ Bee A Crafter XD {Crafting Along} ~ Wondermom Wannabe {This Is How We Roll Thursday}
A To Zebra Celebrations {Link Party Tuesday} ~ Bee A Crafter XD {Crafting Along} ~ Wondermom Wannabe {This Is How We Roll Thursday}
Subscribe to:
Posts (Atom)